This post shows a form control widget that performs validation on its input. The invalid input is highlighted in red and the error message is display below the input. The input is validated in real-time (as the text is changed) when invalid the submit button is disabled and when valid it is enabled. The desired effect is shown below:
Saturday, 16 June 2018
Saturday, 9 June 2018
Order Independent Transparency
Transparency in OpenGL is usually achieved using blending. Good looking results can be achieved by changing the blend function used and in the process we can avoid advanced techniques that require depth sorting.
In this post, I show how to achieve order independent transparency with python and OpenGL. The desired effect is shown below:
Saturday, 2 June 2018
Styling QT Applications: Button Tabs
This post demonstrates how to create custom tabs using QPushButtons in a QButtonGroup. The code below is self explanatory, the button group ensures that only a single button can be selected at one time. The buttons are made to look more like tabs using QT style sheet and the final result is shown below
Friday, 25 May 2018
Add checkbox in QTableView header using icons
There is no API to insert a checkbox into the header of a QTableView. The recommended way of achieving this is to subclass the QHeaderView and draw the checkbox in the paintSection() method which is in my opinion overkill for such a simple feature.
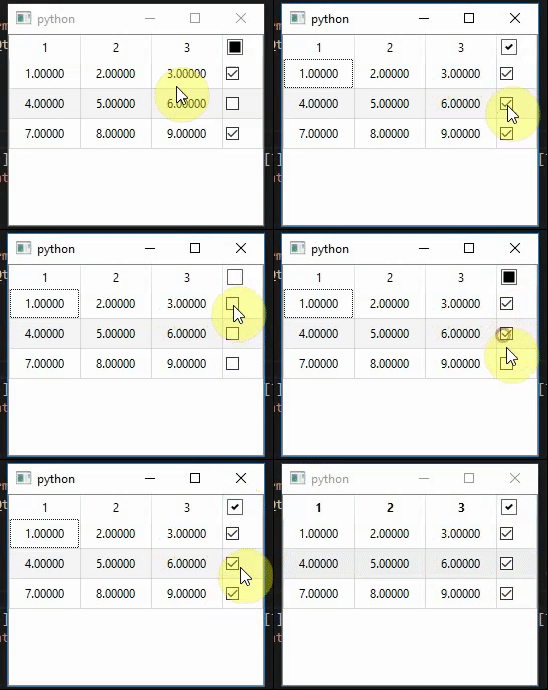
In this post, I show how to achieve a similar effect by simply adding icons in the header. The desired effect is shown below:
Thursday, 20 June 2013
Moment-Based De-skewing
I needed to discover the orientation of an object in a binary image then de-skew the image. Hough transform would not work for me cause I needed speed so I opted for the use of image moments. Using second order central moments, it is possible to calculate the angle that the major axis of the object forms with the horizontal axis. The algorithm used can determine this angle to within ±90 degrees. So let get started.
Code
import cv2
from math import atan, pi, ceil
img = cv2.imread('mask3.jpg', 0)
h,w = img.shape[:2]
cv2.imshow('original', img)
m = cv2.moments(img)
# You can read about Image Moments
# Chapter 18 Shape analysis - Page 633
# Digital Image Processing 4th Edition By William K. Pratt
# OR http://en.wikipedia.org/wiki/Image_moment
x = m['m10']/m['m00']
y = m['m01']/m['m00']
mu02 = m['mu02']
mu20 = m['mu20']
mu11 = m['mu11']
lambda1 = 0.5*( mu20 + mu02 ) + 0.5*( mu20**2 + mu02**2 - 2*mu20*mu02 + 4*mu11**2 )**0.5
lambda2 = 0.5*( mu20 + mu02 ) - 0.5*( mu20**2 + mu02**2 - 2*mu20*mu02 + 4*mu11**2 )**0.5
lambda_m = max(lambda1, lambda2)
# Convert from radians to degrees
angle = atan((lambda_m - mu20)/mu11)*180/pi
print angle
# Create a rotation matrix and use it to de-skew the image.
center = tuple(map(int, (x, y)))
rotmat = cv2.getRotationMatrix2D(center, angle , 1)
rotatedImg = cv2.warpAffine(img, rotmat, (w, h), flags = cv2.INTER_CUBIC)
cv2.imshow('final', rotatedImg)
cv2.waitKey()
Results
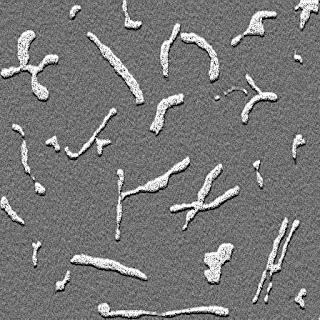
I would not be explaining the maths behind Image moments, if you care to know more check the reference in the code. Nothing explains code better than some tests! Here are a few test images and the de-skewed resulting images.| Original Image | De-skewed Image | Orientation (degree) |
|---|---|---|
![]() |
![]() |
-89.99 |
![]() |
![]() |
-0.0 |
![]() |
![]() |
-39.03 |
![]() |
![]() |
46.95 |
![]() |
![]() |
3.57 |
Conclusion
As you can see the algorithm works pretty well, an anticlockwise skew returns a negative angle and a clockwise skew returns a positive angle. Be aware the results you get will vary based on the quality of the segmented mask. Low quality (see last test image) segmentation would change the centre of the mask and this would after the calculated angle. So depending on your case you might need some pre-processing before de-skewing. Please feel free to post questions in the comments. Happy Coding!
Monday, 27 May 2013
Working with Video Using OpenCV and QT - Part 2
This tutorial was written because of a request from a previous tutorial. In this tutorial, we improve upon the work done in that tutorial by adding a track-bar and display duration of the video. Also a few errors, I discovered will also be corrected in this tutorial. So let get cracking.
Add widgets to GUI
This is an extension to a previous tutorial so I will only point out changes or additions to the previous work so as not to repeat myself. Open the mainwindow.ui file, this file
could be edited manually but for this tutorial we would use the
designer.
- Add a horizontal track-bar to the GUI, this would be used to the adjust the position in the video.
- Add two labels to the GUI; place one on the left and another on the right of the horizontal track-bar ( or however suits your needs) the left one would show the current time into the video whereas the right one would be used to show the total time of the video. The GUI should now look similar to the image above.
Player Class Definition
Now we add a few function definitions to Player class header file -player.h.
#ifndef PLAYER_H
#ifndef PLAYER_H
#define PLAYER_H
#include <QMutex>
#include <QThread>
#include <QImage>
#include <QWaitCondition>
#include <opencv2/core/core.hpp>
#include <opencv2/imgproc/imgproc.hpp>
#include <opencv2/highgui/highgui.hpp>
using namespace cv;
class Player : public QThread
{ Q_OBJECT
private:
....
VideoCapture *capture;
Mat RGBframe;
QImage img;
signals:
......
protected:
......
public:
.......
//set video properties
void setCurrentFrame( int frameNumber);
//Get video properties
double getFrameRate();
double getCurrentFrame();
double getNumberOfFrames();
};
#endif // VIDEOPLAYER_H
The class definition is still simple and straightforward. We add a few public setter and getter functions to enable us grab some important video parameters. Also I change the capture variable to a pointer I discovered that it was not possible to reload a new video once one has been loaded so to correct this I initialize a new VideoCapture instance when a new video is loaded. So the method used to access the VideoCapture instance members must be changed from the "." to the "->" notation.
Player Class Implementation
Here is the constructor for the Player class.
bool Player::loadVideo(string filename) {
capture = new cv::VideoCapture(filename);
if (capture->isOpened())
{
frameRate = (int) capture->get(CV_CAP_PROP_FPS);
return true;
}
else
return false;
}
void Player::run()
{
int delay = (1000/frameRate);
while(!stop){
if (!capture->read(frame))
{
stop = true;
}
.....
}
}
In the loadVideo() method, we use the instance of the VideoCapture class to load the video and set the frame rate. As you should already know the VideoCapture class is from the OpenCV library
double Player::getCurrentFrame(){
return capture->get(CV_CAP_PROP_POS_FRAMES);
}
double Player::getNumberOfFrames(){
return capture->get(CV_CAP_PROP_FRAME_COUNT);
}
double Player::getFrameRate(){
return frameRate;
}
void Player::setCurrentFrame( int frameNumber )
{
capture->set(CV_CAP_PROP_POS_FRAMES, frameNumber);
}
Here are the getter and setter function to access the video information. I ran into a glitch, with ffmpeg where the capture->get(CV_CAP_PROP_FRAME_COUNT) function returned the wrong frame count. The solution might be to update my ffmpeg. I would update the post once the solution is confirmed.
Player::~Player()
{
mutex.lock();
stop = true;
capture.release();
delete capture;
condition.wakeOne();
mutex.unlock();
wait();
}
Here is the rest of the Player class, in the destructor we release the VideoCapture object, also we allocated memory with the new keyword it must be freed.
MainWindow Class Definition
#ifndef MAINWINDOW_H
#define MAINWINDOW_H
#include <QMainWindow>
#include <QFileDialog>
#include <QMessageBox>
#include <player.h>
#include <QTime>
namespace Ui {
class MainWindow;
}
class MainWindow : public QMainWindow
{
Q_OBJECT
public:
.......
private slots:
.........
QString getFormattedTime(int timeInSeconds);
void on_horizontalSlider_sliderPressed();
void on_horizontalSlider_sliderReleased();
void on_horizontalSlider_sliderMoved(int position);
private:
........
};
#endif // MAINWINDOW_H
Here is the class definition for the MainWindow class, we include the 3 event slots for the new horizontal slider and a update some other functions
Mainwindow class implementation
MainWindow::MainWindow(QWidget *parent) :
QMainWindow(parent),
ui(new Ui::MainWindow)
{
.......
ui->pushButton_2->setEnabled(false);
ui->horizontalSlider->setEnabled(false);
}
We disable the play button and the horizontal slider; these would be enabled once a video is loaded.
void MainWindow::updatePlayerUI(QImage img)
{
if (!img.isNull())
{
ui->label->setAlignment(Qt::AlignCenter);
ui->label->setPixmap(QPixmap::fromImage(img).scaled(ui->label->size(),
Qt::KeepAspectRatio, Qt::FastTransformation));
ui->horizontalSlider->setValue(myPlayer->getCurrentFrame());
ui->label_2->setText( getFormattedTime( (int)myPlayer->getCurrentFrame()/(int)myPlayer->getFrameRate()) );
}
}
The updatePlayerUI slot receives a QImage and resizes it to fit the label (keeping the aspect ratio) which will be used to display. It displays the image by setting the label pixmap. We also update the horizontal slider position and the label that displays the elapsed time. We calculate the duration of the video but dividing the total number of frames by the frame rate.
void MainWindow::on_pushButton_clicked()
{
QString filename = QFileDialog::getOpenFileName(this,
tr("Open Video"), ".",
tr("Video Files (*.avi *.mpg *.mp4)"));
QFileInfo name = filename;
if (!filename.isEmpty()){
if (!myPlayer->loadVideo(filename.toAscii().data()))
{
QMessageBox msgBox;
msgBox.setText("The selected video could not be opened!");
msgBox.exec();
}
else{
this->setWindowTitle(name.fileName());
ui->pushButton_2->setEnabled(true);
ui->horizontalSlider->setEnabled(true);
ui->horizontalSlider->setMaximum(myPlayer->getNumberOfFrames());
ui->label_3->setText( getFormattedTime( (int)myPlayer->getNumberOfFrames()/(int)myPlayer->getFrameRate()) );
}
}
}
QString MainWindow::getFormattedTime(int timeInSeconds){
int seconds = (int) (timeInSeconds) % 60 ;
int minutes = (int) ((timeInSeconds / 60) % 60);
int hours = (int) ((timeInSeconds / (60*60)) % 24);
QTime t(hours, minutes, seconds);
if (hours == 0 )
return t.toString("mm:ss");
else
return t.toString("h:mm:ss");
}
void MainWindow::on_horizontalSlider_sliderPressed()
{
myPlayer->Stop();
}
void MainWindow::on_horizontalSlider_sliderReleased()
{
myPlayer->Play();
}
void MainWindow::on_horizontalSlider_sliderMoved(int position)
{
myPlayer->setCurrentFrame(position);
ui->label_2->setText( getFormattedTime( position/(int)myPlayer->getFrameRate()) );
}
This is the remaining part of the MainWindow Class, the getFormattedTime function takes the time in seconds and formats it for display, the rest is self explanatory. You can Download the full code Here.
Final words...
This is just a simple tutorial to help anyone get started with videos in OpenCV and QT. Please let me know if this was helpful and ask questions and give suggestions(if any) in the comments. Happy Coding!
Wednesday, 24 April 2013
How to make a custom QT project template
In this article, we will learn how to create a project template in QT creator . Why would I need custom QT project template you ask? If you work with multiple external libraries like OpenCV, QWT etc, you would have to manually add the libraries' path into the project file for every new project that requires them; this quickly becomes an inconvenience if you have a lot of projects and you don't know the configuration by heart. So lets get started.
QT Template
This tutorial is not intended to discuss QT templates in-depth for such a tutorial you would need to refer to the QT documentation. Rather, I have created a sample custom QT project template and would explain the needed alteration so you can use this to create your own template. As soon as you have gotten the sample from here and extracted the contents you should see something similar to the default QT GUI project except for wizard.xml. Before I get into what that does, let's see how to install this project template.
Installing the custom QT project template
After extracting the folder containing the project template, you would need to copy this folder into the share/qtcreator/templates/wizards/ folder in your QtCreator folder, the location of this folder will vary depending on where you installed QT. Also depending on where you installed QtCreator you might need root permission on a Linux machine before copying. Once copied, you can launch Qt creator and open the new Project wizard you should see a new project category and a new project type. selecting this new type would open a wizard which would contain the regular pages used to create a project with an extra page titled "Add External Libraries" in this sample I have included check-boxes for OpenCV and QWT selecting anyone of these would include the specified library into the created project.
How does this work?
The major job is done in wizard.xml. Most of the xml elements are self explanatory...for deeper knowledge about each element checkout the QT documentation. More importantly the <files> element allows you to specify what files you want to be added to the project by changing this you can convert the template into a console project template or any other project. Equally important is the <fields> element which allow us to add a new wizard page and throw in some check-boxes via the <field> tags. Each field has a name, a control and description.
<wizard version="1" kind="project"
class="qt4project" firstpage="10"
id="A.customqtproject" category="B.CustomProjects">
<icon>console.png</icon>
<description>Creates a custom Qt project which allows you to include external libraries.</description>
<displayname>Custom QT Projects</displayname>;
<displaycategory>Custom Projects</displaycategory>
<files>
<file source="main.cpp" openeditor="true"/>
<file source="mainwindow.cpp" openeditor="false"/>
<file source="mainwindow.h" openeditor="false"/>
<file source="mainwindow.ui" openeditor="false"/>
<file source="project.pro" target="%ProjectName%.pro" openproject="true"/>
</files>
<!-- Create a 2nd wizard page with parameters -->
<fieldpagetitle>Add External Libraries</fieldpagetitle>
<fields>
<field name="OPENCV">
<fieldcontrol class="QCheckBox" truevalue="" falsevalue="# "/>
<fielddescription>Include OpenCV Libraries</fielddescription>
</field>
<field name="QWT">
<fieldcontrol class="QCheckBox" truevalue="" falsevalue="# "/>
<fielddescription>Include QWT Libraries</fielddescription>
</field>
</fields>
</wizard>
A few alterations were made to the project.pro file. We append the following lines to the bottom of the default QT GUI project file.
# Opencv Library %OPENCV%INCLUDEPATH += "/usr/local/include/opencv2" %OPENCV%LIBS += `pkg-config --cflags --libs opencv` # Qwt library %QWT%CONFIG += qwt %QWT%INCLUDEPATH +="/usr/local/qwt-6.1.0-rc3/include" %QWT%LIBS += -L/usr/local/qwt-6.1.0-rc3/lib -lqwt
The first two lines are the configuration for an OpenCv project on my machine. You will need to change this to suit your system. Note that the configuration is preceded by name of the field for the configuration inserted between two percentage signs. To add more libraries to your template you simply add more fields to the wizard and add the configuration for that library to the .pro file preceded by the name of the controlling field.When a new project is created using this template the wizard simply checks which field is not selected and it comments that out but if it is selected it is included.
Conclusion
This tutorial has shown just one way to make a custom QT project template. I chose this method because it is typical for me to start a project with one library and half way into the project remember I need another library so with this method all I need to do is uncomment the desired library in the project file. Happy and hopefully faster coding!
Tuesday, 23 April 2013
How to install OpenCV on OpenShift
I wanted to deploy an OpenCV(Python) application on the internet and needed a free hosting service after searching I found OpenShift which is an Platform as a service provider. They offer a variety of application type (python, ruby, php, django etc.) The free tier allow you to host 3 application with 1GB of storage. So it took me weeks before I could get OpenCV installed properly with no errors - one major problem was storage constraints so I had to delete any file that was unimportant and install only the necessities. After the whole thing was over I thought it would be nice to write about it.
Sign up and create an application
The first step would be to sign up for an OpenShift account. Then create a new application select a Do-It-Yourself (custom) application and complete the wizard. After the wizard is completed you would need to go to the application page and copy the secure shell (ssh) session command which you can access by clicking the "WANT TO LOG IN TO YOUR APPLICATION?" link.
Having copied the command, open a terminal and paste it to get started.
Installation
Disclaimer: From here on you're going to be looking at loads of scrolling text. So if you are allergic to boredom get a drink or open up a movie on the side. Copy the scripts below and paste in the command line. Note that I delete the apps , data and doc folders from the OpenCV installation so as to save space this could be a problem if you need haarcascade.xml or any stuff located in these folders, so if that is your case you must check and customize your installation from line 57 of the script but be careful to avoid the "Disk quota exceeded" error.# Install python cd $OPENSHIFT_TMP_DIR wget http://python.org/ftp/python/2.7.3/Python-2.7.3.tar.bz2 tar jxf Python-2.7.3.tar.bz2 cd Python-2.7.3 ./configure --prefix=$OPENSHIFT_DATA_DIR --enable-shared make make altinstall export PATH=$OPENSHIFT_DATA_DIR/bin:$PATH export LD_LIBRARY_PATH=$OPENSHIFT_DATA_DIR/lib # Install setuptools cd $OPENSHIFT_TMP_DIR wget --no-check-certificate https://pypi.python.org/packages/2.7/s/setuptools/setuptools-0.6c11-py2.7.egg#md5=fe1f997bc722265116870bc7919059ea sh setuptools-0.6c11-py2.7.egg export PATH=$OPENSHIFT_DATA_DIR/bin:$PATH export LD_LIBRARY_PATH=$OPENSHIFT_DATA_DIR/lib # Install pip cd $OPENSHIFT_TMP_DIR wget --no-check-certificate http://pypi.python.org/packages/source/p/pip/pip-1.1.tar.gz tar zxf pip-1.1.tar.gz cd pip-1.1 python2.7 setup.py install --prefix=$OPENSHIFT_DATA_DIR/lib/python2.7/site-packages/ python2.7 setup.py install export PATH=$OPENSHIFT_DATA_DIR/bin:$PATH export LD_LIBRARY_PATH=$OPENSHIFT_DATA_DIR/lib # Install numpy $OPENSHIFT_DATA_DIR/bin/pip install numpy # House-cleaning cd $OPENSHIFT_TMP_DIR rm -r Python-2.7.3 rm Python-2.7.3.tar.bz2 rm -r pip-1.1/ rm pip-1.1.tar.gz rm setuptools-0.6c11-py2.7.egg # Install CMake cd $OPENSHIFT_TMP_DIR wget http://www.cmake.org/files/v2.8/cmake-2.8.10.2.tar.gz tar xvf cmake-2.8.10.2.tar.gz cd cmake-2.8.10.2 ./configure --prefix=$OPENSHIFT_DATA_DIR gmake gmake install # Download OPenCV cd $OPENSHIFT_TMP_DIR wget http://sourceforge.net/projects/opencvlibrary/files/opencv-unix/2.4.3/OpenCV-2.4.3.tar.bz2/download tar xvf OpenCV-2.4.3.tar.bz2 # More House-cleaning rm cmake-2.8.10.2.tar.gz rm OpenCV-2.4.3.tar.bz2 cd OpenCV-2.4.3/ rm -r 3rdparty/ rm -r android rm -r doc rm -r data rm -r ios rm -r samples rm -r apps rm README rm -r ../cmake-2.8.10.2/Tests rm -r ../cmake-2.8.10.2/Testing rm -r ../cmake-2.8.10.2/Example rm -r ../cmake-2.8.10.2/Docs rm -r ../cmake-2.8.10.2/Source
Congratulations you are now half way through the process, But now you have to do something before installing OpenCV. To reduce the build size; we turn off build tests and remove the lines that copy the data, apps and doc folders. Just follow these steps:
- Open CMakeList.txt in vi editor using the command vi CMakeList.txt.
- Show line numbers using the :set number command.
- Go to Lines 155 and 156 and turn off regression and performance test.
- Delete Lines 448 to 456.
- Save and Quit using the :wq command.
mkdir release cd release $OPENSHIFT_DATA_DIR/bin/cmake cmake ../OpenCV-2.4.3 -D BUILD_NEW_PYTHON_SUPPORT=ON -D CMAKE_BUILD_TYPE=RELEASE -D CMAKE_INSTALL_PREFIX=$OPENSHIFT_DATA_DIR -D PYTHON_LIBRARY=$OPENSHIFT_DATA_DIR/lib/libpython2.7.so -D CMAKE_INCLUDE_PATH=$OPENSHIFT_DATA_DIR/include/python2.7 -D PYTHON_INCLUDE_DIR=$OPENSHIFT_DATA_DIR/include/python2.7 -D PYTHON_PACKAGES_PATH=$OPENSHIFT_DATA_DIR/lib/python2.7/site-packages -D PYTHON_EXECUTABLE=$OPENSHIFT_DATA_DIR/bin/python2.7 -D WITH_OPENEXR=OFF -D BUILD_DOCS=OFF -DBUILD_SHARED_LIBS=ON .. make make install
Test
Open the python console by typing python2.7 in the command line. import cv2, if you have no error you are good to go but if you have a "NameError: name 'cv2' is not defined" something is wrong.
Python 2.7.3 (default, May 28 2013, 07:58:37)
[GCC 4.4.7 20120313 (Red Hat 4.4.7-3)] on linux2
Type "help", "copyright", "credits" or "license" for more information.
>>> import cv2
>>> A = cv2.imread("A.jpg")
>>> print A
None
Conclusion
This concludes the installation you can now clean up the $OPENSHIFT_TMP folder and install Django or any other web framework you want to use. Hope this was helpful, feel free to share this post and ask question if any. Happy Coding!
Tuesday, 16 April 2013
The VMMR Project - Part 1
So you ask what is a VMMR? VMMR is an acronym for Vehicle Make and Model Recognition. A VMMR system utilizes computer vision techniques to determine the Make and Model of a vehicle e.g. BMW X3, FORD Focus etc.
The VMMR system could also provide improved surveillance and tracking in the event of crime. Most times when a crime is committed and the criminal escapes using a vehicle. The police officers collect a description of the criminal and the escape vehicle. These officers now have to review large amounts of surveillance videos to find the criminal using the given vehicle description. With a VMMR system, the amounts of video to be watched could be reduced to the few places where a particular make and model has been discovered thereby speeding up the capture of the criminal.
Another use of VMMR could for marketing research; a company might decide to do a survey of about the vehicles they manufacture or sell. They wanted to find out how many of such vehicles are being used in a region and target their marketing and advertising based on the results of the survey. A VMMR system can provide an automated way of performing such a survey and returning very accurate results. Now you know how important this project is ............sure you do. Now what's this project about?
Why VMMR?
Several vehicle monitoring and security systems are based on automated number plate recognition (ANPR), for example, an ANPR systems could be used to prevent illegal entry into a particular location, or to enforce traffic laws or taxes in a city and could also be used to track vehicles in the event of any crime. One of the available ways of circumventing monitoring and security systems that are based on the ANPR is number plate forgery; here the person involved clones an already registered number plate so as to either gain entrance into a facility as the original owner of the number plate or to evade tracking after committing a criminal offence. Because of number plate forgery, ANPR systems are not sufficient to ensure proper security. One way to solve the problem of number plate forgery would be to argument existing security systems that use ANPR with a vehicle make and model recognition (VMMR) system.With such a system, it will be possible to match the vehicle’s plate numbers with the pre-registered make, model, and even colour of the vehicle. This will the make number plate forgery a more difficult task although not completely impossible. Other possible applications of VMMR are tracking and marketing research.The VMMR system could also provide improved surveillance and tracking in the event of crime. Most times when a crime is committed and the criminal escapes using a vehicle. The police officers collect a description of the criminal and the escape vehicle. These officers now have to review large amounts of surveillance videos to find the criminal using the given vehicle description. With a VMMR system, the amounts of video to be watched could be reduced to the few places where a particular make and model has been discovered thereby speeding up the capture of the criminal.
Another use of VMMR could for marketing research; a company might decide to do a survey of about the vehicles they manufacture or sell. They wanted to find out how many of such vehicles are being used in a region and target their marketing and advertising based on the results of the survey. A VMMR system can provide an automated way of performing such a survey and returning very accurate results. Now you know how important this project is ............sure you do. Now what's this project about?
The Project
I will be implementing a web-based VMMR system using the following:- OpenCv Python Libraries
- Django - Python web framework
- OpenShift - Free PAAS used to host the system
- Other web technologies i.e. JQuery, Ajax..
Conclusion
As you can see the project will contain the works - feature extraction, machine learning etc. I might not release all the source code but will place pointers as to how to get started in each section and improve the articles as I learn stuff. So, I have to get back to work but I will see you soon. Happy coding !Tuesday, 12 March 2013
Plot Multi-Channel Histogram in QWT -Part 2
This is the second part in a series on how to do multi-channel plots in QWT. These kinds of plots can be done very simply in Matlab but are more challenging to implement in C++. Armed with the QWT library, we have investigated how to overlay multiple channel histograms on each other. Here I will show you how to make a plot similar to what you would do with the subplot() function in Matlab. This method simply puts multiple channels into one window in a grid form; this method is more presentable and makes it easier to compare plots. Lets get started...
Code
The most important part of the code is the PlotMatrix class which uses a QGridLayout to arrange the sub-plots into a matrix with specified number of rows and cols.The class is defined in the plotmatix.h header file and implemented in plotmatrix.cpp. In main.cpp we define and implement a MainWindow class which inherits from the PlotMatrix class, the histograms are created from an image and displayed in the MainWindow.
The Main function and others
The MainWindow class is a derived class from the PlotMatrix class. Here, we define a 2 by 3 matrix of plots in a static manner(Although, we only want to plot 3 channels). Grid lines are included in the plots for fun but this can be removed or edited as needed.
#include <QApplication>
#include <plotmatrix.h>
#include <qwt_plot.h>
#include <qwt_plot_curve.h>
#include <qwt_plot_grid.h>
#include <qwt_symbol.h>
#include <qwt_legend.h>
#include <opencv2/core/core.hpp>
#include <opencv2/imgproc/imgproc.hpp>
#include <opencv2/highgui/highgui.hpp>
using namespace cv;
class MainWindow: public PlotMatrix
{
public:
MainWindow():PlotMatrix( 2, 3 )
{
for ( int row = 0; row < numRows(); row++ )
{
for ( int col = 0; col < numColumns(); col++ )
{
//set default scale if any.
setAxisScale( QwtPlot::yLeft, row, col, 0, 100 );
setAxisScale( QwtPlot::xBottom, row, col, 0, 255 );
QwtPlot *plt = plot( row, col );
plt->setCanvasBackground( QColor( Qt::darkGray ) );
//Allows the Axis to scale automatically.
plt->setAxisAutoScale(QwtPlot::yLeft, true);
//Show plot grid lines just for aesthetics.
QwtPlotGrid *grid = new QwtPlotGrid();
grid->enableXMin( true );
grid->setMajorPen( Qt::white, 0, Qt::DashLine);
grid->setMinorPen( Qt::gray, 0 , Qt::DotLine );
grid->attach( plt );
}
}
}
};
void getPoints(MatND& hist, int* histSize, QPolygonF& points)
{
points.clear();
for( int h = 0; h < histSize[0]; ++h) {
float bin_value = hist.at<float>(h);
points << QPointF((float)h, bin_value);
}
}
class Curve: public QwtPlotCurve
{
public:
Curve( const QString &title, const QColor &colour, int penSize,
QPolygonF &points ):QwtPlotCurve( title )
{
QColor c = colour;
c.setAlpha( 150 );//handle colour transparency
setPen(c, penSize);
setBrush( c );
setSamples( points );
setRenderHint( QwtPlotItem::RenderAntialiased );
}
};
int main(int argc, char *argv[])
{
QApplication a(argc, argv);
if (argc < 2)
return 1;
//Read input image
Mat img = imread(argv[1]);
//Convert to grayscale
if (img.data && img.channels() != 3)
return 1;
MainWindow mainWindow;
mainWindow.resize( 600, 400 );
int histSize[] = {256}; // number of bins
float hranges[] = {0.0, 255.0}; // min and max pixel value
const float* ranges[] = {hranges};
int channels[] = {0}; // only 1 channel used
std::vector<Mat> rgbChannels(3);
split(img, rgbChannels);
MatND hist;
QPolygonF points;
calcHist(&rgbChannels[2], 1, channels, Mat(), hist, 1, histSize,ranges);
/*Insert the points that should be plotted on the graph in a
Vector of QPoints or a QPolgonF */
getPoints(hist, histSize, points);
Curve *curve = new Curve("Red Channel", Qt::red, 2, points);
curve->attach( mainWindow.plot(0,0) ); // Attach curve to the plot
calcHist(&rgbChannels[1], 1, channels, Mat(), hist, 1, histSize,ranges);
getPoints(hist, histSize, points);
curve = new Curve("Green Channel", Qt::green, 2, points);
curve->attach( mainWindow.plot(0,1) );
calcHist(&rgbChannels[0], 1, channels, Mat(), hist, 1, histSize,ranges);
getPoints(hist, histSize, points);
curve = new Curve("Blue Channel", Qt::blue, 2, points);
curve->attach( mainWindow.plot(0,2) );
mainWindow.show(); //Show plot
return a.exec();
}
PlotMatrix class
This implementation uses a QVector of pointers to QwtPlot instances to represent the matrix of subplots. It provides a function plot(row, col) which returns the pointer to the desired plot.
//PlotMatrix.h
#ifndef _PLOT_MATRIX_H_
#define _PLOT_MATRIX_H_
#include <qframe.h>
#include <qwt_plot.h>
class PlotMatrix: public QFrame
{
Q_OBJECT
public:
PlotMatrix( int rows, int columns, QWidget * parent = NULL );
virtual ~PlotMatrix();
int numRows() const;
int numColumns() const;
QwtPlot* plot( int row, int column );
const QwtPlot* plot( int row, int column ) const;
void setAxisScale(int axisId, int row, int col,
double min, double max, double step = 0 );
private:
QVector<QwtPlot *> plotWidgets;
};
#endif
//PlotMatrix.cpp
//This is based on the PlotMatrix implementation in the Qwt Samples.
#include <qlayout.h>
#include <qpen.h>
#include <qwt_plot.h>
#include <qwt_scale_widget.h>
#include <qwt_scale_draw.h>
#include "plotmatrix.h"
PlotMatrix::PlotMatrix( int numRows, int numColumns, QWidget *parent ):
QFrame( parent )
{
plotWidgets.resize( numRows * numColumns );
QGridLayout *layout = new QGridLayout( this );
for ( int row = 0; row < numRows; row++ )
{
for ( int col = 0; col < numColumns; col++ )
{
QwtPlot *plot = new QwtPlot( this );
layout->addWidget( plot, row, col );
plotWidgets[row * numColumns + col] = plot;
}
}
}
PlotMatrix::~PlotMatrix()
{
foreach(QwtPlot* p, plotWidgets)
delete p;
}
int PlotMatrix::numRows() const
{
const QGridLayout *l = qobject_cast<const QGridLayout *>( layout() );
if ( l )
return l->rowCount();
return 0;
}
int PlotMatrix::numColumns() const
{
const QGridLayout *l = qobject_cast<const QGridLayout *>( layout() );
if ( l )
return l->columnCount();
return 0;
}
QwtPlot* PlotMatrix::plot( int row, int column )
{
const int index = row * numColumns() + column;
if ( index < plotWidgets.size() )
return plotWidgets[index];
return NULL;
}
const QwtPlot* PlotMatrix::plot( int row, int column ) const
{
const int index = row * numColumns() + column;
if ( index <plotWidgets.size() )
return plotWidgets[index];
return NULL;
}
void PlotMatrix::setAxisScale( int axis, int row, int col,
double min, double max, double step )
{
QwtPlot *plt = plot( row, col );
if ( plt )
{
plt->setAxisScale( axis, min, max, step );
plt->updateAxes();
}
}
Result
Conclusion
The subplot() is one of the most useful matlab functions if you plot several graphs or images. Now you can have something similar in QWT although not as simple. It is also possible to plot multi-channel histograms in a 3 dimensional plot, we leave this for another time. Happy Coding!.
Saturday, 2 March 2013
Plot Multi-Channel Histogram in QWT -Part 1
Here I will show you how to plot a multi-channel/colour histogram using QWT. I generate the histograms for the different channels in a RGB image using OpenCV, then I plot the histogram of each channel overlaid on each other on the same axis. This method is suitable for visualization but not very suitable for peak/valley histogram analysis as the overlaid colours would merge making it difficult to see what peaks/valleys belong to which channel.
The set-up for this tutorial is similar to the one in my previous tutorial, only this time I also include the OpenCV library. Again, we can just dive straight into the code.
Code
#include <QApplication>
#include <qwt_plot.h>
#include <qwt_plot_curve.h>
#include <qwt_plot_grid.h>
#include <qwt_symbol.h>
#include <qwt_legend.h>
#include <opencv2/core/core.hpp>
#include <opencv2/imgproc/imgproc.hpp>
#include <opencv2/highgui/highgui.hpp>
using namespace cv;
void getPoints(MatND& hist, int* histSize, QPolygonF& points)
{
for( int h = 0; h < histSize[0]; ++h) {
float bin_value = hist.at<float>(h);
points << QPointF((float)h, bin_value);
}
}
class Curve: public QwtPlotCurve
{
public:
Curve( const QString &title ):
QwtPlotCurve( title )
{
setRenderHint( QwtPlotItem::RenderAntialiased );
}
void setColour(const QColor &color, int penSize)
{
QColor c = color;
c.setAlpha( 150 );
setPen(c, penSize);
setBrush( c );
}
};
int main(int argc, char *argv[])
{
QApplication a(argc, argv);
if (argc < 2)
return 1;
//Read input image
Mat img = cv::imread(argv[1]);
//Convert to grayscale
if (img.data && img.channels() != 3)
return 1;
QwtPlot plot; //Create plot widget
plot.setTitle( "Plot Demo" ); //Name the plot
plot.setCanvasBackground(Qt::white ); //Set the Background colour
plot.setAxisScale(QwtPlot::xBottom,0,255); //Scale the x-axis
plot.insertLegend(new QwtLegend()); //Insert a legend
int histSize[] = {256}; // number of bins
float hranges[] = {0.0, 255.0}; // min and max pixel value
const float* ranges[] = {hranges};
int channels[] = {0}; // only 1 channel used
std::vector<cv::Mat> rgbChannels(3);
split(img, rgbChannels);
MatND hist;
QPolygonF points;
calcHist(&rgbChannels[2], 1, channels, cv::Mat(), hist, 1, histSize,ranges);
Curve *curve = new Curve("Red Channel");
curve->setColour(Qt::red , 2);//Set colour and thickness for drawn curve.
/*Insert the points that should be plotted on the graph in a
Vector of QPoints or a QPolgonF */
getPoints(hist, histSize, points);
curve->setZ( curve->z() - 1 );
curve->setSamples(points); //pass points to be drawn on the curve
curve->attach( &plot ); // Attach curve to the plot
calcHist(&rgbChannels[1], 1, channels, cv::Mat(), hist, 1, histSize,ranges);
curve = new Curve("Green Channel");
curve->setColour(Qt::green , 2);
points.clear();
getPoints(hist, histSize, points);
curve->setZ( curve->z() - 2 );
curve->setSamples( points );
curve->attach( &plot );
calcHist(&rgbChannels[0], 1, channels, cv::Mat(), hist, 1, histSize,ranges);
curve = new Curve("Blue Channel");
curve->setColour(Qt::blue, 2);
points.clear();
getPoints(hist, histSize, points);
curve->setZ( curve->z() - 3 );
curve->setSamples( points );
curve->attach( &plot );
plot.resize( 600, 400 ); //Resize the plot
plot.show(); //Show plot
return a.exec();
}
Result
Figure 1: A) The input image B) The resulting plot
Note: It is possible to remove the coloured area under the curves and reduce the plot to a simple line plot. This would make each channels' peaks and valleys more visible. This could be done by commenting out line:36 in the code. The result is shown below.
Figure 2: The result with the setBrush() property turned off.
Conclusion
That concludes this part of the tutorial, it is also possible to plot each histogram in its separate axis (in a matrix format) similar to what using the subplot() function in matlab does. This would be seen in our next tutorial. Happy Coding!.
Wednesday, 13 February 2013
Entropy-based histogram thresholding
I read about entropy thresholding[1] and I wanted to give it a try. This technique was rather simple to implement in Matlab compared to other more complex methods and performed reasonably (see results).
Code
function [A, T] = EntropyThresholding(img)
[h, ~] = imhist(img);
h = h/sum(h); % Normalize the histogram so that it sums to 1.
entropies = zeros(256, 1); % Intialize array for storing entropies.
for t = 1:254
White = h(1:t);
Black = h(t+1:255);
% Add 0.001 to prevent division by zero(nan) and log of zero(-inf).
HB = sum((Black/(0.001+sum(Black))).*log((Black+0.001)/(0.001 +sum(Black))));
HW = sum((White/(0.001+sum(White))).*log((White+0.001)/(0.001 +sum(White))));
entropies(t) = HB+HW;
end
[~, T] = max(abs(entropies)); % The Maximal entropy determines the threshold.
T = T - 1;
A = img > T;
Results
References
1. J.N. Kapur, P.K. Sahoo and A.K.C. Wong, "A New Method for Gray-Level Picture Thresholding Using the Entropy of
the Histogram", CVGIP, (29), pp.273-285 , 1985.
Saturday, 2 February 2013
Draw an OpenCV histogram using QWT
The QWT Library gives us the ability to create graphs, scale axes, insert legend and do a whole lot of graphing stuff, in a very easy manner. I wanted to show how easy it was to use so in this tutorial I plot an openCV histogram using QWT.
The set-up for this tutorial is similar to the one in my previous tutorial, only this time I also include the OpenCV library. So we can dive straight into the code.
Code
#include <QApplication>
#include <qwt_plot.h>
#include <qwt_plot_curve.h>
#include <qwt_plot_grid.h>
#include <qwt_symbol.h>
#include <qwt_legend.h>
#include <opencv2/core/core.hpp>
#include <opencv2/imgproc/imgproc.hpp>
#include <opencv2/highgui/highgui.hpp>
int main(int argc, char *argv[])
{
QApplication a(argc, argv);
if (argc < 2)
return 1;
//Read input image
cv::Mat img = cv::imread(argv[1]);
//Convert to grayscale
if (img.data && img.channels() == 3)
cv::cvtColor(img, img, CV_BGR2GRAY);
else
return 1;
int histSize[1] = {256}; // number of bins
float hranges[2] = {0.0, 255.0}; // min and max pixel value
const float* ranges[1] = {hranges};
int channels[1] = {0}; // only 1 channel used
cv::MatND hist;
// Compute histogram
cv::calcHist(&img, 1, channels, cv::Mat(), hist, 1, histSize,ranges);
double minVal, maxVal;
cv::minMaxLoc(hist, &minVal, &maxVal);//Locate max and min values
QwtPlot plot; //Create plot widget
plot.setTitle( "Plot Demo" ); //Name the plot
plot.setCanvasBackground( Qt::black ); //Set the Background colour
plot.setAxisScale( QwtPlot::yLeft, minVal, maxVal ); //Scale the y-axis
plot.setAxisScale(QwtPlot::xBottom,0,255); //Scale the x-axis
plot.insertLegend(new QwtLegend()); //Insert a legend
QwtPlotCurve *curve = new QwtPlotCurve(); // Create a curve
curve->setTitle("Count"); //Name the curve
curve->setPen( Qt::white, 2);//Set colour and thickness for drawing the curve
//Use Antialiasing to improve plot render quality
curve->setRenderHint( QwtPlotItem::RenderAntialiased, true );
/*Insert the points that should be plotted on the graph in a
Vector of QPoints or a QPolgonF */
QPolygonF points;
for( int h = 0; h < histSize[0]; ++h) {
float bin_value = hist.at<float>(h);
points << QPointF((float)h, bin_value);
}
curve->setSamples( points ); //pass points to be drawn on the curve
curve->attach( &plot ); // Attach curve to the plot
plot.resize( 600, 400 ); //Resize the plot
plot.show(); //Show plot
return a.exec();
}
The code is well commented and is therefore self explanatory - no need for extra explanations. The result can be seen in the image below.
Wednesday, 30 January 2013
Getting started with QWT
I have been looking for a graphing API for QT and eventually found one that suits my needs called QWT ( Qt Widgets for Technical Applications). I ran into some issues while setting it up but finally got it running so here is the resulting tutorial on how to set-up QWT in QT creator (for Linux 12.0.4).
Now we can begin, first step is to download the source files from here. The version used for this tutorial is QWT 6.1. In the terminal, navigate to the location of the downloaded .tar.bz2 file, then type the following commands:
$ tar -xjvf qwt-6.1-rc3.tar.bz2 $ cd qwt-6.1-rc3 $ qmake qwt.pro $ make $ make install
Launch QT creator and then Go to File > New File or Project. Select a QT Gui Application give the project a name e.g. “FirstQwtProject”.You could leave the other settings in the wizard as they are or change them to suit your own projects. I have kept the 'FirstQwtProject.pro' ( this will vary depending on the Project Name you have chosen) and 'main.cpp' but deleted the remaining files (MainWindow class) as they would not be need for this simple introduction. To run QWT programs in QT creator we need to let the IDE know where to find the QWT libraries.
So open the .pro file associated with the project and append the following lines at the end of the file. This should be included in every QWT Project you create but remember to change the include Path "/usr/local/qwt-6.1.0-rc3/.." to the location of the QWT install directory on your PC.
CONFIG += qwt INCLUDEPATH +="/usr/local/qwt-6.1.0-rc3/include" LIBS += -L/usr/local/qwt-6.1.0-rc3/lib -lqwt
Now go to the 'main.cpp' file and type in the following lines of code and press Ctrl+R to run it.
#include <QApplication>
#include <qwt_plot.h>
#include <qwt_plot_curve.h>
#include <qwt_plot_grid.h>
#include <qwt_symbol.h>
#include <qwt_legend.h>
int main(int argc, char *argv[])
{
QApplication a(argc, argv);
QwtPlot plot;
plot.setTitle( "Plot Demo" );
plot.setCanvasBackground( Qt::white );
plot.setAxisScale( QwtPlot::yLeft, 0.0, 10.0);
plot.insertLegend( new QwtLegend() );
QwtPlotGrid *grid = new QwtPlotGrid();
grid->attach( &plot );
QwtPlotCurve *curve = new QwtPlotCurve();
curve->setTitle( "Pixel Count" );
curve->setPen( Qt::blue, 4 ),
curve->setRenderHint( QwtPlotItem::RenderAntialiased, true );
QwtSymbol *symbol = new QwtSymbol( QwtSymbol::Ellipse,
QBrush( Qt::yellow ), QPen( Qt::red, 2 ), QSize( 8, 8 ) );
curve->setSymbol( symbol );
QPolygonF points;
points << QPointF( 0.0, 4.4 ) << QPointF( 1.0, 3.0 )
<< QPointF( 2.0, 4.5 ) << QPointF( 3.0, 6.8 )
<< QPointF( 4.0, 7.9 ) << QPointF( 5.0, 7.1 );
curve->setSamples( points );
curve->attach( &plot );
plot.resize( 600, 400 );
plot.show();
return a.exec();
}
This is what you should see.
Conclusion
QWT Libraries are one of many options for plotting graphs in QT. In the next tutorial, I will show you how to plot histograms calculated via OpenCV with QWT.
Monday, 28 January 2013
Find Holes in a binary image
Since OpenCV is yet to provide special functions for blob analysis. I will show you a simple method of determining the number of holes in an image. This method exploits the ability of OpenCV's findContours() function to extract and distinguish between outer contour (shape boundaries) and inner contours (hole boundaries). For this tutorial, I assume the input image is a binary image. We will be using the 2 images below.
Figure 1: A) a complex shape with multiple levels of contours. B) a simple shape with 2 holes
The result from the application are the following images
Figure 2: Resulting images showing location of holes in A) Figure 1A B) Figure 1B.
Code
Here is the full code:#include <iostream>
#include <opencv2/core/core.hpp>
#include <opencv2/highgui/highgui.hpp>
#include <opencv2/imgproc/imgproc.hpp>
using namespace cv;
using namespace std;
int main(int argc, char *argv[])
{
if( argc != 2)
{
cout << " No image file is specified \n ";
return -1;
}
Mat src = imread(argv[1]);
vector<vector<Point> > contours;
vector<Vec4i> hierarchy;
findContours( src.clone(), contours, hierarchy, CV_RETR_TREE, CV_CHAIN_APPROX_NONE );
Mat singleLevelHoles = Mat::zeros(src.size(), src.type());
Mat multipleLevelHoles = Mat::zeros(src.size(), src.type());
for(vector<Vec4i>::size_type idx=0; idx<hierarchy.size(); ++idx)
{
if(hierarchy[idx][3] != -1)
drawContours(singleLevelHoles, contours, idx, Scalar::all(255), CV_FILLED, 8, hierarchy);
}
bitwise_not(src, src);
bitwise_and(src, singleLevelHoles, multipleLevelHoles);
//Inverse source image.
imwrite("/home/stephen/Pictures/Result0.jpg", src);
//Holes before the bitwise AND operation.
imwrite("/home/stephen/Pictures/Result1.jpg", singleLevelHoles);
//Holes after the bitwise AND Operation.
imwrite("/home/stephen/Pictures/Result2.jpg", multipleLevelHoles);
return 0;
}
Explanation
- Lines 1-4: Standard includes from the OpenCV and C++ libraries.
- Lines 11-17: Error checking command line input. The image file path is passed in as command line input; the image is read into memory .
- Lines 19-22: We extract contours along with the hierarchy information about the contours using the findContours() function in OpenCV. The contour retrieval mode is set to CV_RETR_TREE which simply retrieves the contour and reconstructs a full-hierarchy of nested contours. In other words, this mode causes the function to return a vector containing an entry for each contour; each entry is an array of 4 values. We are concerned with the last value of this array which tells us the parent of the contour. This value is set to -1 for outer contours otherwise it is set to the index of the parent contour in the hierarchy vector. For more information on contour hierarchy see here. The contour approximation method is set to CV_CHAIN_APPROX_NONE which basically tells the function to store all contour points.
- Lines 28-32: After extracting the contours, we use the hierarchy information to draw all the holes using the drawContours() function; the thickness is set to CV_FILLED so that the drawn contours are filled with white pixels (255). This is perfect for when you do not have multiple levels of contours like Figure 1B but for the figure 1A the result would be as shown below.
Figure 3: Resulting image showing holes in Figure 1A before applying logical operation.
- Lines 34-35: The result above could be undesirable for some operations; so the bitwise NOT and AND logical operations are used to get the location the inner contours of the image.
Conclusion
This is just a simple way to extract holes from an image without having to bother about extra libraries like cvBLobLib. Hope it was helpful. Happy Coding!
Monday, 10 December 2012
Working with Video Using OpenCV and QT
Video processing is a very important task in computer vision applications. OpenCV comes with its own GUI library (Highgui); but this library has no support for buttons and some other GUI components. Therefore it could be preferable to use a QT GUI application, but displaying a video in a QT GUI is not as intuitive as it is with Highgui. This tutorial will show you how to display video in a QT GUI, without the GUI becoming unresponsive. We would be creating a simple video player as shown below and would be programming in C++.
STEP 1: Create a new QT GUI Project
If you don't know how to do this check
out the guide here. The guide shows you how to create an
OpenCV console project in Qt-creator, but this time instead of using a Qt
Console Application, create a Qt GUI Application. Once created the following files are automatically added into the project:
main.cpp
|
This contains the main function
which is the starting point of all C++ applications. It is the
main function the loads the main window for the GUI application.
|
mainwindow.cpp
|
This is the source file that
contains the MainWindow class implementation.
|
mainwindow.h
|
This contains the class declaration for the MainWindow class. |
mainwindow.ui
|
This is the UI designer file that could be used to tweak the GUI.
|
| <projectName>.pro | This contains settings that are used for the project compilation. |
Add widgets to GUI
Open the mainwindow.ui file, this file
could be edited manually but for this tutorial we would use the
designer.
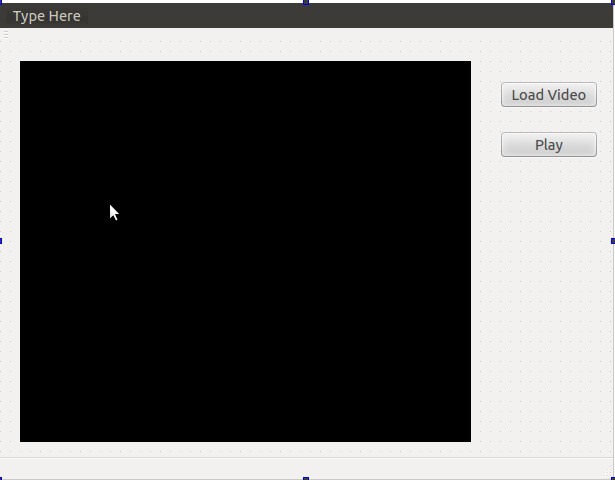
- From the list of widgets on the left of the designer, drag in a label and two pushbutton widgets.
- Change the text on the first button to “Load Video” and on the second button to “Play”. Then Clear the text on the label. To change the text on a widget just double click on the widget the text would be highlighted, you can now change it and press enter when finished.
- Change the background colour of the label to a darker colour. The best way to change the background colour of a QT widget is to use Cascading StyleSheets or CSS. Select the label find the stylesheet property in the property window click on the button with Three dots (ellipsis) and add this line of CSS into the “Edit Style sheet” window and save it.
Background-color: #000;
- The GUI should now look something like this:
Player Class Definition
Now we add a new class to handle our video player control, we will call this the “Player” Class the following class definition should be added in player.h
#ifndef PLAYER_H
#define PLAYER_H
#include <QMutex>
#include <QThread>
#include <QImage>
#include <QWaitCondition>
#include <opencv2/core/core.hpp>
#include <opencv2/imgproc/imgproc.hpp>
#include <opencv2/highgui/highgui.hpp>
using namespace cv;
class Player : public QThread
{ Q_OBJECT
private:
bool stop;
QMutex mutex;
QWaitCondition condition;
Mat frame;
int frameRate;
VideoCapture capture;
Mat RGBframe;
QImage img;
signals:
//Signal to output frame to be displayed
void processedImage(const QImage &image);
protected:
void run();
void msleep(int ms);
public:
//Constructor
Player(QObject *parent = 0);
//Destructor
~Player();
//Load a video from memory
bool loadVideo(string filename);
//Play the video
void Play();
//Stop the video
void Stop();
//check if the player has been stopped
bool isStopped() const;
};
#endif // VIDEOPLAYER_H
The class definition is simple and straightforward. The first thing to note is that Player class inherits from the QThread Class which will allow it to run on its own thread this is very important so that the main window remains responsive while the video is playing without this the video will cause the screen to freeze until it has finished playing. The processedImage(...) signal will be used to output the video frames to the main window (we would see how this work later).
Player Class Implementation
Here is the constructor for the Player class
Player::Player(QObject *parent)
: QThread(parent)
{
stop = true;
}
Here we simply initialise the value of the class variable stop
bool Player::loadVideo(string filename) {
capture.open(filename);
if (capture.isOpened())
{
frameRate = (int) capture.get(CV_CAP_PROP_FPS);
return true;
}
else
return false;
}
In the loadVideo() method, we use the instance of the VideoCapture class to load the video and set the frame rate. As you should already know the VideoCapture class is from the OpenCV library
void Player::Play()
{
if (!isRunning()) {
if (isStopped()){
stop = false;
}
start(LowPriority);
}
}
The public method play() simply starts the thread by calling the run() method which is an override of the QThread run method.
void Player::run()
{
int delay = (1000/frameRate);
while(!stop){
if (!capture.read(frame))
{
stop = true;
}
if (frame.channels()== 3){
cv::cvtColor(frame, RGBframe, CV_BGR2RGB);
img = QImage((const unsigned char*)(RGBframe.data),
RGBframe.cols,RGBframe.rows,QImage::Format_RGB888);
}
else
{
img = QImage((const unsigned char*)(frame.data),
frame.cols,frame.rows,QImage::Format_Indexed8);
}
emit processedImage(img);
this->msleep(delay);
}
}
In the run method, we utilise a while loop to play the video after reading the frame, it is converted into a QImage and the QImage is emitted to the MainWindow object using the processedImage(...) signal; at the end of the loop we wait for a number of milliseconds (delay) which is calculated using the frame rate of the video. If the video frame was been processed it would be advisable to factor the processing time into the delay.
Player::~Player()
{
mutex.lock();
stop = true;
capture.release();
condition.wakeOne();
mutex.unlock();
wait();
}
void Player::Stop()
{
stop = true;
}
void Player::msleep(int ms){
struct timespec ts = { ms / 1000, (ms % 1000) * 1000 * 1000 };
nanosleep(&ts, NULL);
}
bool Player::isStopped() const{
return this->stop;
}
Here is the rest of the Player class, in the destructor we release the VideoCapture object and wait for the run method to exit.
MainWindow Class Definition
#ifndef MAINWINDOW_H
#define MAINWINDOW_H
#include <QMainWindow>
#include <QFileDialog>
#include <QMessageBox>
#include <player.h>
namespace Ui {
class MainWindow;
}
class MainWindow : public QMainWindow
{
Q_OBJECT
public:
explicit MainWindow(QWidget *parent = 0);
~MainWindow();
private slots:
//Display video frame in player UI
void updatePlayerUI(QImage img);
//Slot for the load video push button.
void on_pushButton_clicked();
// Slot for the play push button.
void on_pushButton_2_clicked();
private:
Ui::MainWindow *ui;
Player* myPlayer;
};
#endif // MAINWINDOW_H
Here is the class definition for the MainWindow class, we include the clicked event slots for both buttons and a updatePlayerUI slot. We also include a myPlayer variable which is an instance of the Player Class
Mainwindow class implementation
MainWindow::MainWindow(QWidget *parent) :
QMainWindow(parent),
ui(new Ui::MainWindow)
{
myPlayer = new Player();
QObject::connect(myPlayer, SIGNAL(processedImage(QImage)),
this, SLOT(updatePlayerUI(QImage)));
ui->setupUi(this);
}
we initialise myPlayer and we connect the signal emitted from the player class to the updatePlayerUI(...) slot, so every time a frame has been emitted it would be passed to this slot.
void MainWindow::updatePlayerUI(QImage img)
{
if (!img.isNull())
{
ui->label->setAlignment(Qt::AlignCenter);
ui->label->setPixmap(QPixmap::fromImage(img).scaled(ui->label->size()
Qt::KeepAspectRatio, Qt::FastTransformation));
}
}
The updatePlayerUI slot receives a QImage and resizes it to fit the label (keeping the aspect ratio) which will be used to display. It displays the image by setting the label pixmap
MainWindow::~MainWindow()
{
delete myPlayer;
delete ui;
}
void MainWindow::on_pushButton_clicked()
{
QString filename = QFileDialog::getOpenFileName(this,
tr("Open Video"), ".",
tr("Video Files (*.avi *.mpg *.mp4)"));
if (!filename.isEmpty()){
if (!myPlayer->loadVideo(filename.toAscii().data()))
{
QMessageBox msgBox;
msgBox.setText("The selected video could not be opened!");
msgBox.exec();
}
}
}
void MainWindow::on_pushButton_2_clicked()
{
if (myPlayer->isStopped())
{
myPlayer->Play();
ui->pushButton_2->setText(tr("Stop"));
}else
{
myPlayer->Stop();
ui->pushButton_2->setText(tr("Play"));
}
}
This is the remaining part of the MainWindow Class, we have the destructor for the class, "load Video"(pushbutton) button slot and the "Play" (pushbutton_2) button slot which all pretty straightforward.
Main() Function
int main(int argc, char *argv[])
{
QApplication a(argc, argv);
MainWindow* w = new MainWindow();
w->setAttribute(Qt::WA_DeleteOnClose, true);
w->show();
return a.exec();
}
And finally, the main function we create an instance of the MainWindow class and set the delete on close attribute so that the objects created are destroyed.
Final words...
This is just a simple tutorial to help anyone get started with videos in OpenCV and QT. It should also be noted that there are other ways to handle videos in QT like the Phonon multimedia framework. Please let me know if this was helpful and ask questions (if any) in the comments. Happy Coding!
UPDATE: SEE PART 2 OF THIS TUTORIAL HERE. WE SHOW YOU HOW TO ADD A TRACK-BAR TO ALLOW THE USER CONTROL THE VIDEO.
Wednesday, 21 November 2012
Getting Started with QT and OpenCV 2.4.2
I recently started
developing with OpenCV 2.4.2 and Qt on a Linux machine (Ubuntu
12.0.4), so I decided to write a few tutorials. Here, we are going to
see how to set-up a development environment particularly Qt-creator to
work with OpenCV.
Please let me know if this was helpful and if there is tutorial you would like me to write mention it in the comments. Happy Coding!
First, you need to install
OpenCV as this has been dealt with severally I don't bother with
this. If you have not yet installed this have a look at this
tutorial
or just search Google for a tutorial that suits you.
Next step you would need to install Qt-creator. This can be done either via the Ubuntu Software Centre or by directly downloading the .bin installer from
here.
Now we can begin, launch QT creator and then
Go to File > New File or Project. Select a QT Console Application (Use a QT GUI Application if you OpenCV installation is configured to use QT and not GTK ) give the project a name e.g. “FirstQtProject”
You could leave the other
settings in the wizard as they are or change them to suit your own
projects. With the default settings, two files would be created: 'FirstQtProject.pro' ( this will vary depending on the Project Name you
have chosen) and 'main.cpp'. To run OpenCV programs in QT creator we
need to let the IDE know where to find the OpenCV libraries.
Open the .pro file
associated with the project and append the following lines at the end
of the file. This should be included in every OpenCV Project you
create but remember to change the include Path
"/usr/local/include/opencv2"
to the location of your OpenCV include directory on your PC.
#Change this to your include directory. INCLUDEPATH += "/usr/local/include/opencv2" LIBS += `pkg-config --cflags --libs opencv`If you don't have Pkg-config installed replace the last line with the following and replace “/usr/local/lib” with the location of the openCV libraries on your PC.
# Confirm the location of you opencv libraries and change appropriately. LIBS += usr/local/lib \ -lopencv_core \ -lopencv_highgui \ -lopencv_imgproc \ -lopencv_flann \ -lopencv_legacy \ -lopencv_ml \ -lopencv_features2d \ -lopencv_calib3dNow go to 'main.cpp' file and type in the following lines of code and press Ctrl+R to run it.
#include <opencv2/core/core.hpp>
#include <opencv2/highgui/highgui.hpp>
int main(void)
{
// Load an image from the disk and store in variable.
cv::Mat image1 = cv::imread("/home/stephen/Pictures/download.jpg");
// Create a image display window called Figure1.
cv::namedWindow("Figure1");
// Display image in Figure1.
cv::imshow("Figure1", image1);
// Wait until user closes the window or presses Esc Key.
cv::waitKey(0);
return 0;
}
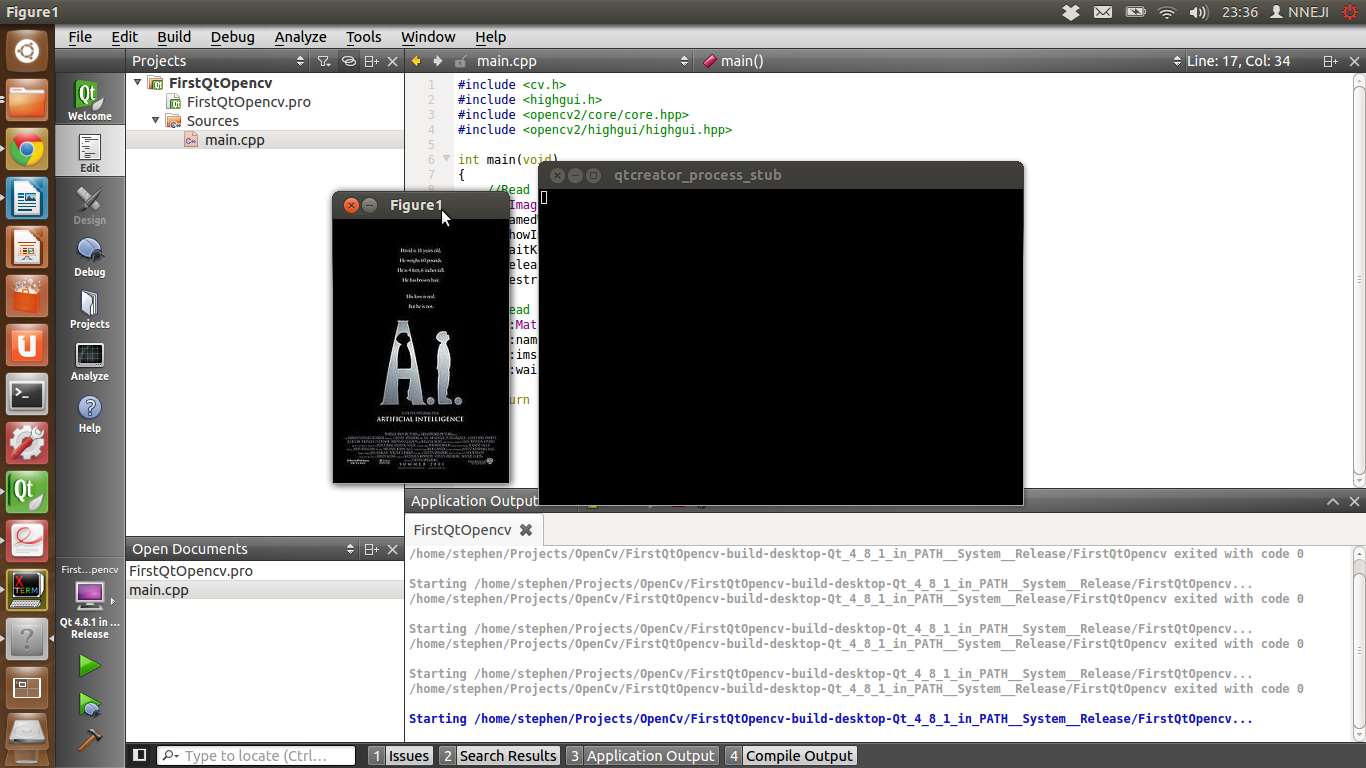
The result should be an empty console window called "qtcreator_process_sub” and a window called “Figure1” containing the loaded image.
Please let me know if this was helpful and if there is tutorial you would like me to write mention it in the comments. Happy Coding!
Subscribe to:
Posts (Atom)