This post shows a form control widget that performs validation on its input. The invalid input is highlighted in red and the error message is display below the input. The input is validated in real-time (as the text is changed) when invalid the submit button is disabled and when valid it is enabled. The desired effect is shown below:
Showing posts with label Python. Show all posts
Saturday, 16 June 2018
Saturday, 9 June 2018
Order Independent Transparency
Transparency in OpenGL is usually achieved using blending. Good looking results can be achieved by changing the blend function used and in the process we can avoid advanced techniques that require depth sorting.
In this post, I show how to achieve order independent transparency with python and OpenGL. The desired effect is shown below:
Saturday, 2 June 2018
Styling QT Applications: Button Tabs
This post demonstrates how to create custom tabs using QPushButtons in a QButtonGroup. The code below is self explanatory, the button group ensures that only a single button can be selected at one time. The buttons are made to look more like tabs using QT style sheet and the final result is shown below
Friday, 25 May 2018
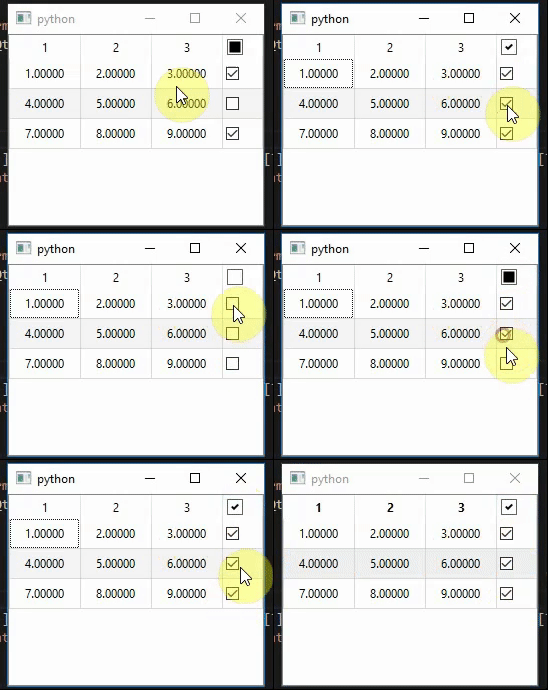
Add checkbox in QTableView header using icons
There is no API to insert a checkbox into the header of a QTableView. The recommended way of achieving this is to subclass the QHeaderView and draw the checkbox in the paintSection() method which is in my opinion overkill for such a simple feature.
In this post, I show how to achieve a similar effect by simply adding icons in the header. The desired effect is shown below:
Thursday, 20 June 2013
Moment-Based De-skewing
I needed to discover the orientation of an object in a binary image then de-skew the image. Hough transform would not work for me cause I needed speed so I opted for the use of image moments. Using second order central moments, it is possible to calculate the angle that the major axis of the object forms with the horizontal axis. The algorithm used can determine this angle to within ±90 degrees. So let get started.
Code
import cv2
from math import atan, pi, ceil
img = cv2.imread('mask3.jpg', 0)
h,w = img.shape[:2]
cv2.imshow('original', img)
m = cv2.moments(img)
# You can read about Image Moments
# Chapter 18 Shape analysis - Page 633
# Digital Image Processing 4th Edition By William K. Pratt
# OR http://en.wikipedia.org/wiki/Image_moment
x = m['m10']/m['m00']
y = m['m01']/m['m00']
mu02 = m['mu02']
mu20 = m['mu20']
mu11 = m['mu11']
lambda1 = 0.5*( mu20 + mu02 ) + 0.5*( mu20**2 + mu02**2 - 2*mu20*mu02 + 4*mu11**2 )**0.5
lambda2 = 0.5*( mu20 + mu02 ) - 0.5*( mu20**2 + mu02**2 - 2*mu20*mu02 + 4*mu11**2 )**0.5
lambda_m = max(lambda1, lambda2)
# Convert from radians to degrees
angle = atan((lambda_m - mu20)/mu11)*180/pi
print angle
# Create a rotation matrix and use it to de-skew the image.
center = tuple(map(int, (x, y)))
rotmat = cv2.getRotationMatrix2D(center, angle , 1)
rotatedImg = cv2.warpAffine(img, rotmat, (w, h), flags = cv2.INTER_CUBIC)
cv2.imshow('final', rotatedImg)
cv2.waitKey()
Results
I would not be explaining the maths behind Image moments, if you care to know more check the reference in the code. Nothing explains code better than some tests! Here are a few test images and the de-skewed resulting images.| Original Image | De-skewed Image | Orientation (degree) |
|---|---|---|
![]() |
![]() |
-89.99 |
![]() |
![]() |
-0.0 |
![]() |
![]() |
-39.03 |
![]() |
![]() |
46.95 |
![]() |
![]() |
3.57 |
Conclusion
As you can see the algorithm works pretty well, an anticlockwise skew returns a negative angle and a clockwise skew returns a positive angle. Be aware the results you get will vary based on the quality of the segmented mask. Low quality (see last test image) segmentation would change the centre of the mask and this would after the calculated angle. So depending on your case you might need some pre-processing before de-skewing. Please feel free to post questions in the comments. Happy Coding!
Tuesday, 23 April 2013
How to install OpenCV on OpenShift
I wanted to deploy an OpenCV(Python) application on the internet and needed a free hosting service after searching I found OpenShift which is an Platform as a service provider. They offer a variety of application type (python, ruby, php, django etc.) The free tier allow you to host 3 application with 1GB of storage. So it took me weeks before I could get OpenCV installed properly with no errors - one major problem was storage constraints so I had to delete any file that was unimportant and install only the necessities. After the whole thing was over I thought it would be nice to write about it.
Sign up and create an application
The first step would be to sign up for an OpenShift account. Then create a new application select a Do-It-Yourself (custom) application and complete the wizard. After the wizard is completed you would need to go to the application page and copy the secure shell (ssh) session command which you can access by clicking the "WANT TO LOG IN TO YOUR APPLICATION?" link.
Having copied the command, open a terminal and paste it to get started.
Installation
Disclaimer: From here on you're going to be looking at loads of scrolling text. So if you are allergic to boredom get a drink or open up a movie on the side. Copy the scripts below and paste in the command line. Note that I delete the apps , data and doc folders from the OpenCV installation so as to save space this could be a problem if you need haarcascade.xml or any stuff located in these folders, so if that is your case you must check and customize your installation from line 57 of the script but be careful to avoid the "Disk quota exceeded" error.# Install python cd $OPENSHIFT_TMP_DIR wget http://python.org/ftp/python/2.7.3/Python-2.7.3.tar.bz2 tar jxf Python-2.7.3.tar.bz2 cd Python-2.7.3 ./configure --prefix=$OPENSHIFT_DATA_DIR --enable-shared make make altinstall export PATH=$OPENSHIFT_DATA_DIR/bin:$PATH export LD_LIBRARY_PATH=$OPENSHIFT_DATA_DIR/lib # Install setuptools cd $OPENSHIFT_TMP_DIR wget --no-check-certificate https://pypi.python.org/packages/2.7/s/setuptools/setuptools-0.6c11-py2.7.egg#md5=fe1f997bc722265116870bc7919059ea sh setuptools-0.6c11-py2.7.egg export PATH=$OPENSHIFT_DATA_DIR/bin:$PATH export LD_LIBRARY_PATH=$OPENSHIFT_DATA_DIR/lib # Install pip cd $OPENSHIFT_TMP_DIR wget --no-check-certificate http://pypi.python.org/packages/source/p/pip/pip-1.1.tar.gz tar zxf pip-1.1.tar.gz cd pip-1.1 python2.7 setup.py install --prefix=$OPENSHIFT_DATA_DIR/lib/python2.7/site-packages/ python2.7 setup.py install export PATH=$OPENSHIFT_DATA_DIR/bin:$PATH export LD_LIBRARY_PATH=$OPENSHIFT_DATA_DIR/lib # Install numpy $OPENSHIFT_DATA_DIR/bin/pip install numpy # House-cleaning cd $OPENSHIFT_TMP_DIR rm -r Python-2.7.3 rm Python-2.7.3.tar.bz2 rm -r pip-1.1/ rm pip-1.1.tar.gz rm setuptools-0.6c11-py2.7.egg # Install CMake cd $OPENSHIFT_TMP_DIR wget http://www.cmake.org/files/v2.8/cmake-2.8.10.2.tar.gz tar xvf cmake-2.8.10.2.tar.gz cd cmake-2.8.10.2 ./configure --prefix=$OPENSHIFT_DATA_DIR gmake gmake install # Download OPenCV cd $OPENSHIFT_TMP_DIR wget http://sourceforge.net/projects/opencvlibrary/files/opencv-unix/2.4.3/OpenCV-2.4.3.tar.bz2/download tar xvf OpenCV-2.4.3.tar.bz2 # More House-cleaning rm cmake-2.8.10.2.tar.gz rm OpenCV-2.4.3.tar.bz2 cd OpenCV-2.4.3/ rm -r 3rdparty/ rm -r android rm -r doc rm -r data rm -r ios rm -r samples rm -r apps rm README rm -r ../cmake-2.8.10.2/Tests rm -r ../cmake-2.8.10.2/Testing rm -r ../cmake-2.8.10.2/Example rm -r ../cmake-2.8.10.2/Docs rm -r ../cmake-2.8.10.2/Source
Congratulations you are now half way through the process, But now you have to do something before installing OpenCV. To reduce the build size; we turn off build tests and remove the lines that copy the data, apps and doc folders. Just follow these steps:
- Open CMakeList.txt in vi editor using the command vi CMakeList.txt.
- Show line numbers using the :set number command.
- Go to Lines 155 and 156 and turn off regression and performance test.
- Delete Lines 448 to 456.
- Save and Quit using the :wq command.
mkdir release cd release $OPENSHIFT_DATA_DIR/bin/cmake cmake ../OpenCV-2.4.3 -D BUILD_NEW_PYTHON_SUPPORT=ON -D CMAKE_BUILD_TYPE=RELEASE -D CMAKE_INSTALL_PREFIX=$OPENSHIFT_DATA_DIR -D PYTHON_LIBRARY=$OPENSHIFT_DATA_DIR/lib/libpython2.7.so -D CMAKE_INCLUDE_PATH=$OPENSHIFT_DATA_DIR/include/python2.7 -D PYTHON_INCLUDE_DIR=$OPENSHIFT_DATA_DIR/include/python2.7 -D PYTHON_PACKAGES_PATH=$OPENSHIFT_DATA_DIR/lib/python2.7/site-packages -D PYTHON_EXECUTABLE=$OPENSHIFT_DATA_DIR/bin/python2.7 -D WITH_OPENEXR=OFF -D BUILD_DOCS=OFF -DBUILD_SHARED_LIBS=ON .. make make install
Test
Open the python console by typing python2.7 in the command line. import cv2, if you have no error you are good to go but if you have a "NameError: name 'cv2' is not defined" something is wrong.
Python 2.7.3 (default, May 28 2013, 07:58:37)
[GCC 4.4.7 20120313 (Red Hat 4.4.7-3)] on linux2
Type "help", "copyright", "credits" or "license" for more information.
>>> import cv2
>>> A = cv2.imread("A.jpg")
>>> print A
None
Conclusion
This concludes the installation you can now clean up the $OPENSHIFT_TMP folder and install Django or any other web framework you want to use. Hope this was helpful, feel free to share this post and ask question if any. Happy Coding!
Tuesday, 16 April 2013
The VMMR Project - Part 1
So you ask what is a VMMR? VMMR is an acronym for Vehicle Make and Model Recognition. A VMMR system utilizes computer vision techniques to determine the Make and Model of a vehicle e.g. BMW X3, FORD Focus etc.
The VMMR system could also provide improved surveillance and tracking in the event of crime. Most times when a crime is committed and the criminal escapes using a vehicle. The police officers collect a description of the criminal and the escape vehicle. These officers now have to review large amounts of surveillance videos to find the criminal using the given vehicle description. With a VMMR system, the amounts of video to be watched could be reduced to the few places where a particular make and model has been discovered thereby speeding up the capture of the criminal.
Another use of VMMR could for marketing research; a company might decide to do a survey of about the vehicles they manufacture or sell. They wanted to find out how many of such vehicles are being used in a region and target their marketing and advertising based on the results of the survey. A VMMR system can provide an automated way of performing such a survey and returning very accurate results. Now you know how important this project is ............sure you do. Now what's this project about?
Why VMMR?
Several vehicle monitoring and security systems are based on automated number plate recognition (ANPR), for example, an ANPR systems could be used to prevent illegal entry into a particular location, or to enforce traffic laws or taxes in a city and could also be used to track vehicles in the event of any crime. One of the available ways of circumventing monitoring and security systems that are based on the ANPR is number plate forgery; here the person involved clones an already registered number plate so as to either gain entrance into a facility as the original owner of the number plate or to evade tracking after committing a criminal offence. Because of number plate forgery, ANPR systems are not sufficient to ensure proper security. One way to solve the problem of number plate forgery would be to argument existing security systems that use ANPR with a vehicle make and model recognition (VMMR) system.With such a system, it will be possible to match the vehicle’s plate numbers with the pre-registered make, model, and even colour of the vehicle. This will the make number plate forgery a more difficult task although not completely impossible. Other possible applications of VMMR are tracking and marketing research.The VMMR system could also provide improved surveillance and tracking in the event of crime. Most times when a crime is committed and the criminal escapes using a vehicle. The police officers collect a description of the criminal and the escape vehicle. These officers now have to review large amounts of surveillance videos to find the criminal using the given vehicle description. With a VMMR system, the amounts of video to be watched could be reduced to the few places where a particular make and model has been discovered thereby speeding up the capture of the criminal.
Another use of VMMR could for marketing research; a company might decide to do a survey of about the vehicles they manufacture or sell. They wanted to find out how many of such vehicles are being used in a region and target their marketing and advertising based on the results of the survey. A VMMR system can provide an automated way of performing such a survey and returning very accurate results. Now you know how important this project is ............sure you do. Now what's this project about?
The Project
I will be implementing a web-based VMMR system using the following:- OpenCv Python Libraries
- Django - Python web framework
- OpenShift - Free PAAS used to host the system
- Other web technologies i.e. JQuery, Ajax..
Conclusion
As you can see the project will contain the works - feature extraction, machine learning etc. I might not release all the source code but will place pointers as to how to get started in each section and improve the articles as I learn stuff. So, I have to get back to work but I will see you soon. Happy coding !
Subscribe to:
Posts (Atom)